• econofibrenz
  • help@econofibre.co.nz
  • Languages
    • English
    • 中文
SUPPORT

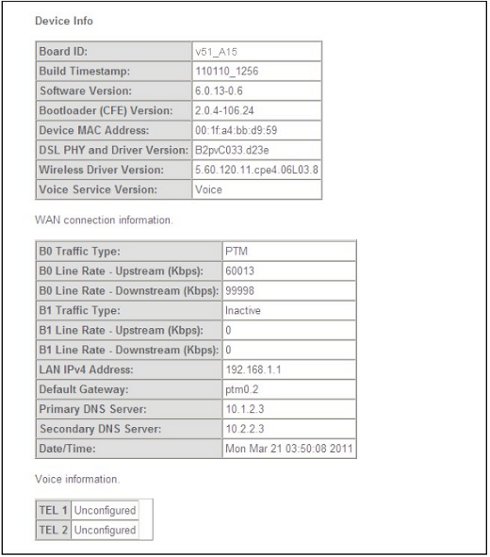
MODEM ROUTER SETUP GUIDEInnbox v51 Router

Support > Modem/Router Setup Guide > Innbox v51 Router

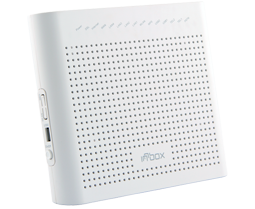
The VDSL2 Home Gateway Imnbox V51 supports delivery of all triple play services: internet data, Voice ober IP (VoIP) and IP video including bandwidth consuming HDTV. For packet based terminal devices it provides 5 Ethernet Gigabit capable ports as well as a wireless access point of latest standard 802.11N that brings relief to those troublesome wirings.

Additionally two ports for telephony services are provided using Voice over IP technology compatible with SIP server environments. With embedded firewall and IP sharing technology this Home Gateway delivers secure broadband Internet access to be shared by all connected clients.Furthermore two USB2.0 host ports are available to enable value-added features such as file server, FTP server, printer server or hub connectivity.

The VDSL2 Home Gateway Innbox V51 also embeds special Quality of Experience (QoE) monitoring client which enables on-line evaluation of data path all the way to HGW, which can reflect in significant lower OPEX of operator.

1 Attach stand at the bottom. Put the router stand at the bottom of the router.
2 Plug router into a power source.
3 You should have dedicated VDSL2 jack-point installed by Chorus, plug phone(DSL) cable from wall jack-point to DSL port of Innbox V51.
4 Connect your PC to the router. Connect your PC or network switch to LAN1-LAN4 port.
5 Go to the router’s access page in your browser. Open your browser and type http://192.168.1.1 into the address bar.
Then, you can see the login pop-up window. There are three different type of username to log-in.
**Do not mix up the user name and password with your VDSL account user name and password which are needed for PPP connections.
6 Main Device Info. After successfully log in, you will see the Device Info screen.

Then, you can see the login pop-up window. There are three different type of username to log-in.
7 Setup Layer2 Interface

Click Advanced Setup > Layer2 Interface > PTM Interface
If you can see ptm0, you can jump to next step. Otherwise, press Add.
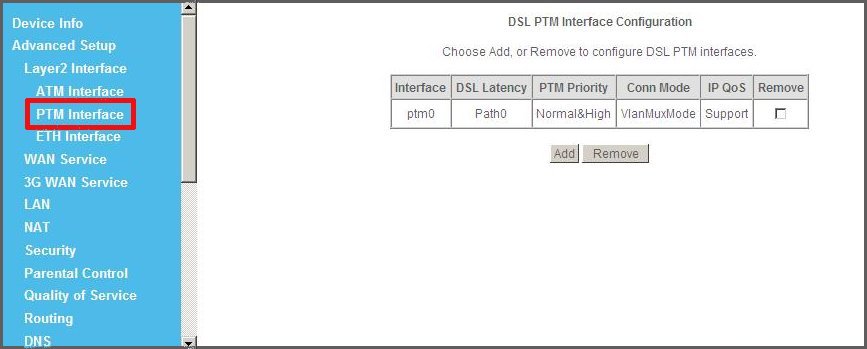
Select Path0 as DSL Latency, and leave all other values as a default. Then press Apply/Save.
8 Setup WAN Service. In the left side menu, click on the Advance Setup tab and then click on the submenu WAN Service to open up the configuration window.
You can see several pre-configured WAN Servces.
Click Edit button for ptm0.1. If ptm0.1 does not exist, click the Add button on the opened window to start activation of the VDSL interface. Select ptm(0_1_1) and click Next.
Select the PPP over Ethernet (PPPOE) option.
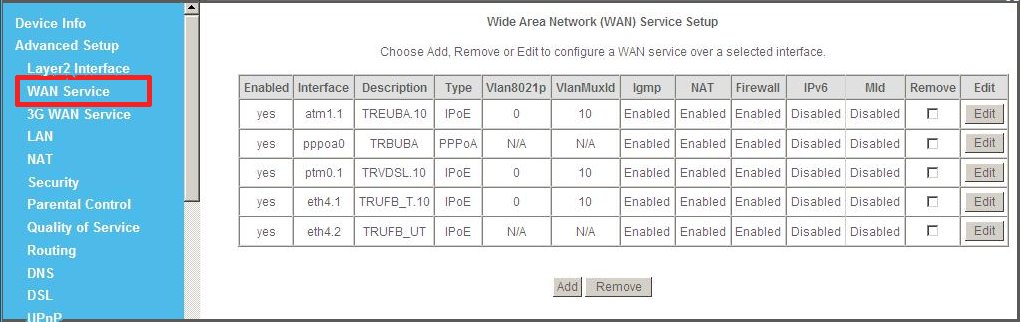
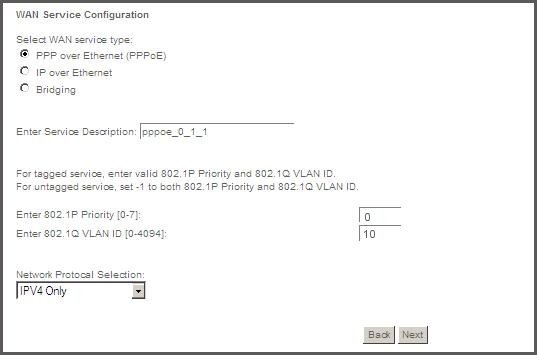
For Chorus VDSL2 Service, enter
- Priority: 802.11P = 0
- VLAN: 802.1Q = 10
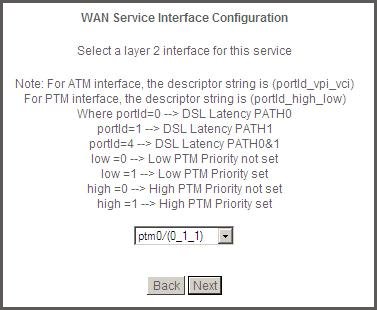
Click Next to continue to the next screen.
In the following section you will need to type in your Econofibre PPP credentials to activate you Internet connection with Econofibre Services.
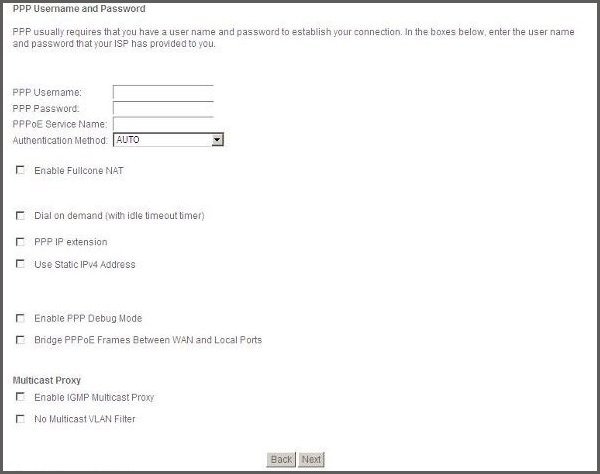
- PPP Username : Put your username for PPPoA authentication. (e.g., johnkey58)
- PPP Password : Put the password for your username.
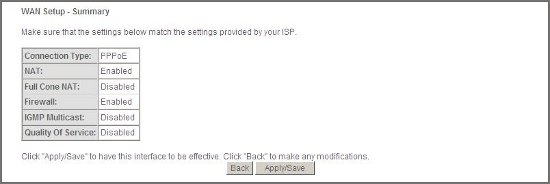
- PPPoE Service Name : This is just service name. Put Econofibre VDSL.
Authentication Method : Auto
Then, click Next.
Setup Default Gateway.
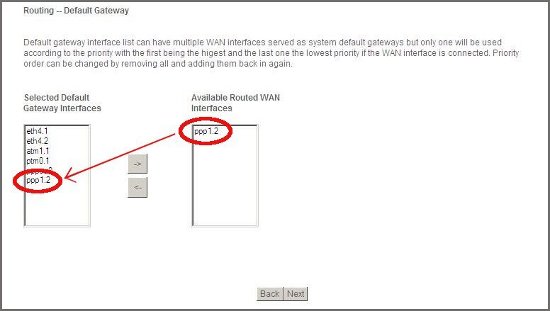
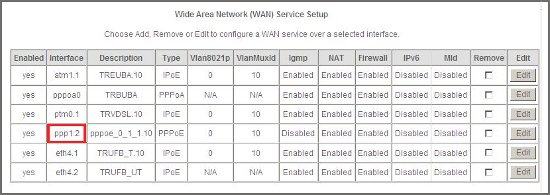
Once you finish to setup PPP configurations in previous page, you can see PPP1.X in the box of Available Routed WAN Interfaces. Click ppp1.X to select and move it to Selected Default Gateway Interfaces Box in left by clicking left arrow(<-).
DNS Configurations
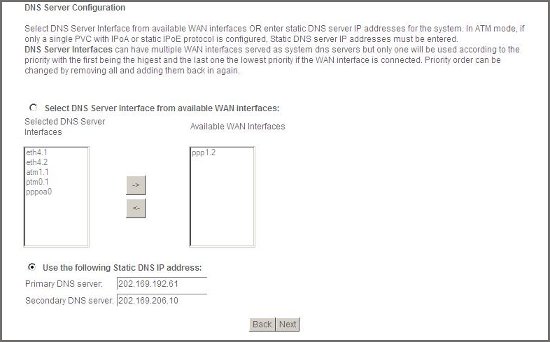
Select Use the following Static DNS IP address. And put the ip addresses of Econofibre DNS servers.
- Primary : 202.169.192.61
- Secondary : 202.169.206.10
Then, click Next. And you can now see the Summary page for the configurations of WAN services.
If you click WAN Services again, you can see PPP1.X is added in the interface list.
9 Wireless Configuration. The WLAN function is enabled by default. You can rename your wireless network name and create your own password in this page.
Click Wireless.
The default wireless name(SSID) is Innbox-internet-XXXXX, you can change this name as you want. And this name will be seen in the available WIFI networks. Once updated, click Apply/Save.
Then, select Security in the left menu. In Select SSID pull-down menu, you can see the SSID you set in above.
- Network Authentication : The type of authentication you want to use. WPA2-PSK is recommended
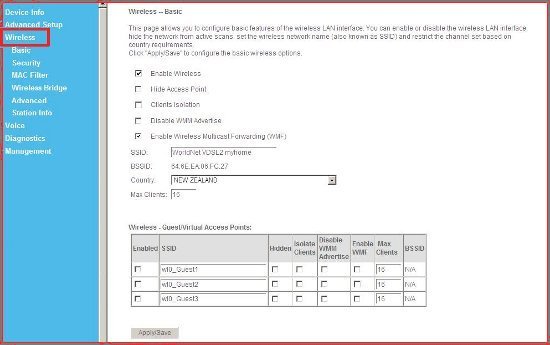
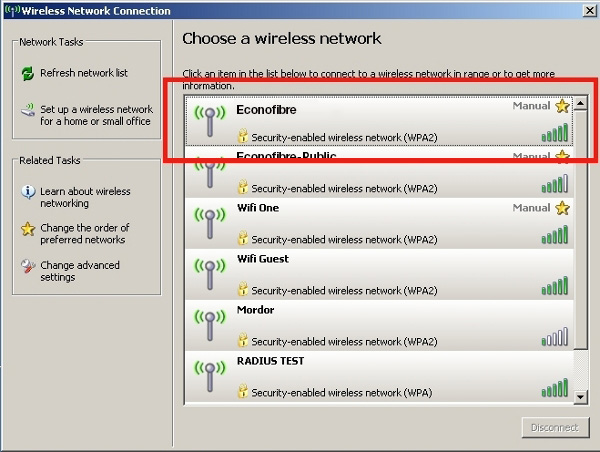
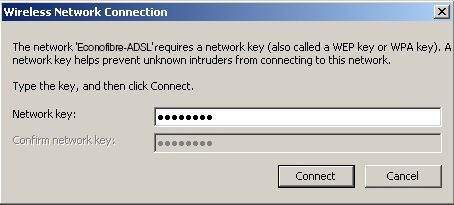
- Wireless Network Key : You can change it to your own password for WIFI connection. You must keep it safely.
Click Apply/Save to continue.
10 Connect WIFI. Once above configurations are done, next is to check the wireless connection. Search SSID you set at step 9 from the available WIFI networks.
Put WIFI password you configured at step9 into popup window.
11 Congratulations. You should now have a fully functioning and secure Innbox V51 vdsl2 router.